DIY Information
Do It Yourself (or DIY) information includes answers to the following questions:
- How Do I Measure Door Size?
- How Do I Measure Jamb Width?
- How Do I Choose Door Handing and Swing?
- How Do I Choose the Right Bore Position (for Hardware)?
- How Do I Install My Door?
How Do I Measure Door Size?
The first step in measuring the width and height of your new door is to measure the rough opening where the door will be placed. Rough opening means the opening in the stud wall structure prior to installing the door frame (door jamb). The process for determining the door width and height needed for your rough opening is as follows:
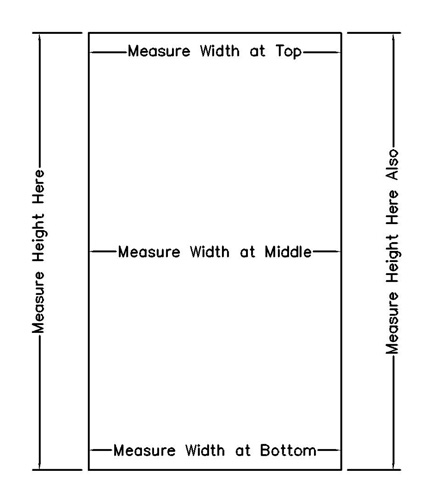
- Measure the width of the rough opening, from inside of wall stud to inside of wall stud (see illustration). Measure this in three places—top of the opening, middle of the opening, and bottom of the opening—and then use the smallest of these three measurements. Then, subtract 2” from this width. This equals your needed door width.
Example: Rough opening measurement = 32”. Door width needed = 30”, or 2’ 6” (32” – 2” = 30”, or 2’ 6”)
- Measure the height of the rough opening, from the floor to the bottom of the upper stud of the opening (see illustration). Measure the height on both corner edges of the opening, and then use the smallest of these two measurements. Then, subtract 3” from this height. This equals your needed door height.
Example: Rough opening height = 83”. Door height needed = 80”, or 6’ 8” (83” – 3” = 80”, or 6’ 8”)
If you are framing the rough opening for a new door (i.e., constructing the wall stud frame), just reverse the measurements above (select your desired finished door width and add 2” to this measurement, then select your desired finished door height and add 3” to this measurement).
Why does the opening need to be larger than the door and its jamb? First, the additional space provides room to adjust the door and jamb to the rough opening. The stud wall structures of rough openings are not always plumb and square, so providing extra space allows the installer to “shim” the jamb for a perfectly plumb, level and square door installation. Second, the additional height allows space for flooring material above the sub-floor such as carpeting, wood, or tile. Last, walls may expand and contract slightly with the natural humidity and moisture changes that occur with changing seasons. So, the extra space allows for minor adjustments to your door fit, as necessary.
How Do I Measure Jamb Width?
To choose the proper jamb width for your pre-hung door, you must determine the thickness of the wall where your door will be placed. Wall thickness includes the wall stud plus the sheetrock thickness. Normally, either 2×4 or 2×6 studs are used for wall framing. Sheetrock is usually either 1/2” thick or 5/8” thick. Determine your wall stud and sheetrock thickness and then use the charts below to select the proper jamb width to match your application.
Flat door jambs are available in the following widths, to match the following wall stud and sheetrock thicknesses:
Finger-joint Pine Flat Jamb:
| Stud, Sheetrock Thickness | Jamb Width |
| 2×4 Stud, 1/2” Sheetrock | 4-5/8” Wide |
| 2×4 Stud, 5/8” Sheetrock | 4-7/8” Wide |
| 2×6 Stud, 1/2” Sheetrock | 6-5/8” Wide |
| 2×6 Stud, 5/8” Sheetrock | 6-7/8” Wide |
Kerfed flat jambs are available in the following widths, to match the following wall stud and sheetrock thicknesses (Note: Kerfed flat jambs are more narrow than regular flat jambs, to allow for wrapping the drywall corner bead into the jamb):
Finger-joint Pine Kerfed Flat Jamb:
| Stud, Sheetrock Thickness | Jamb Width |
| 2×4 Stud, 1/2” Sheetrock | 3-1/2” Wide |
| 2×4 Stud, 5/8” Sheetrock | 3-1/2” Wide |
| 2×6 Stud, 1/2” Sheetrock | 5-1/2” Wide |
| 2×6 Stud, 5/8” Sheetrock | 5-1/2” Wide |
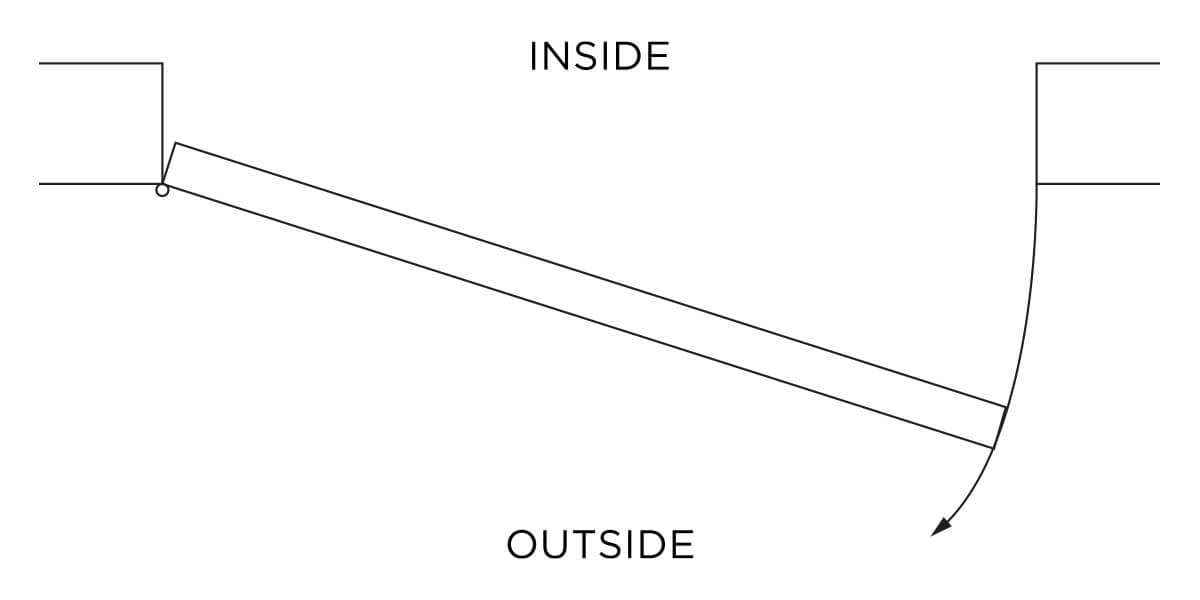
How Do I Choose Door Handing and Swing?
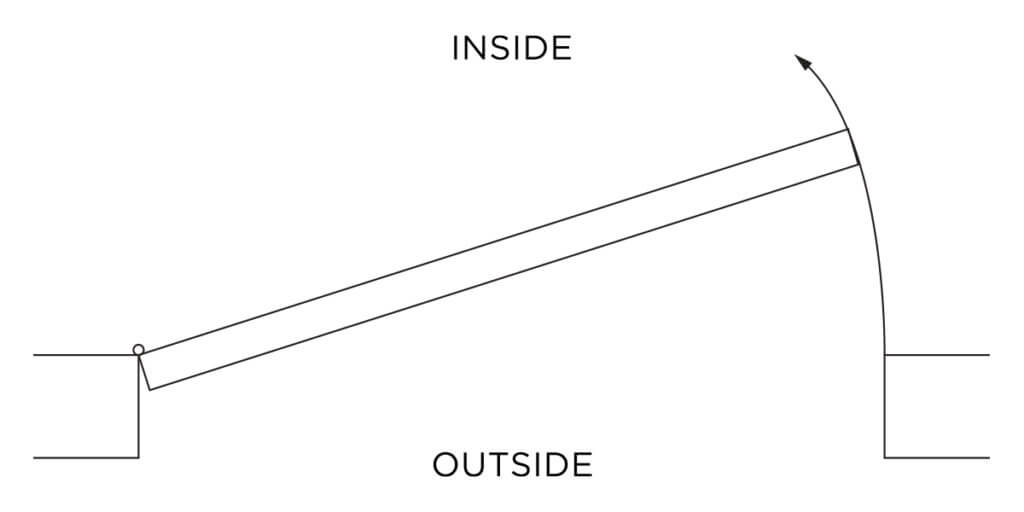
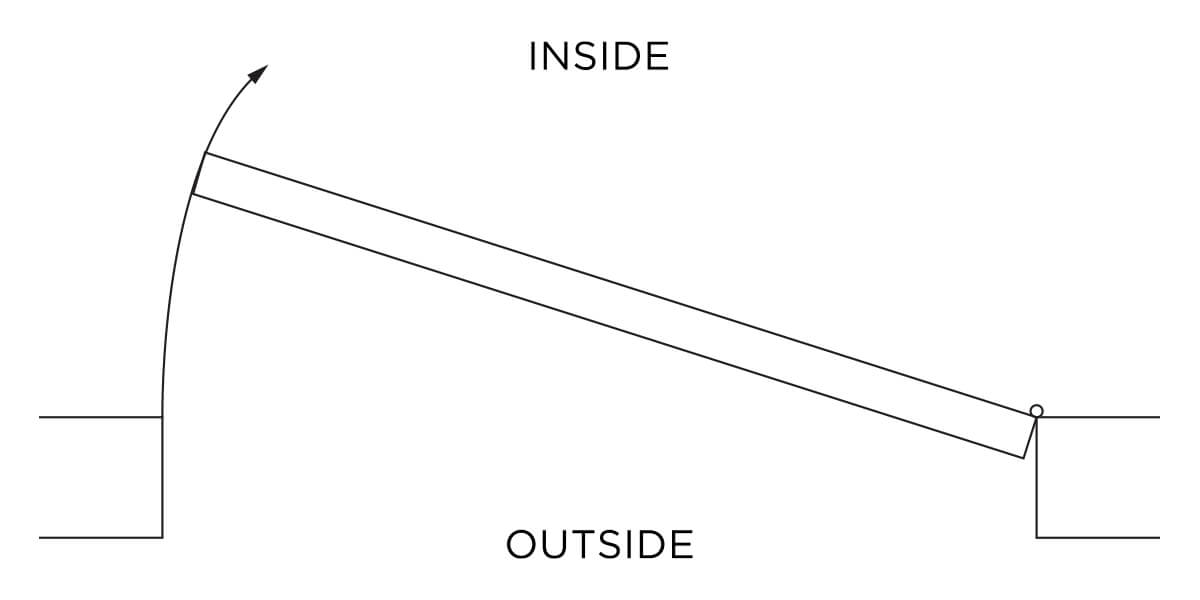
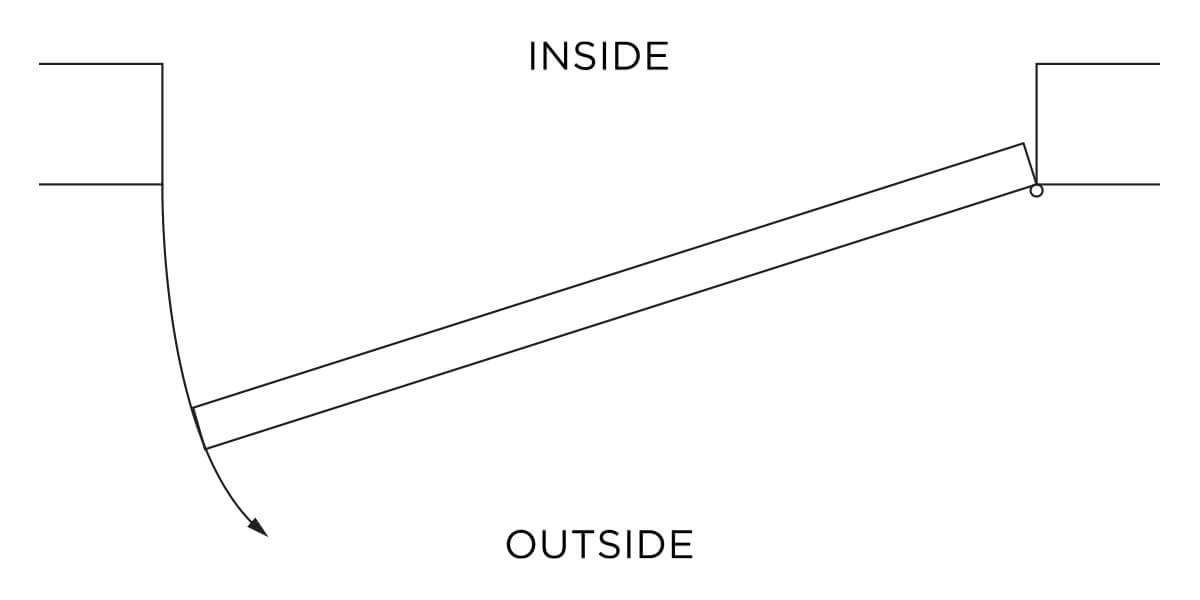
Handing and Swing refers to the side of the door that is hinged, and the way the door swings inside or outside of the room. Consider the way you would like your door to open when making this choice.
A simple way to understand handing is to stand in the doorway with your back against the jamb of the door where you want the hinges to be placed. From this position, if you want the door to open to your left, it is a left-hand door. From this position, if you want the door to open to your right, it is a right-hand door.
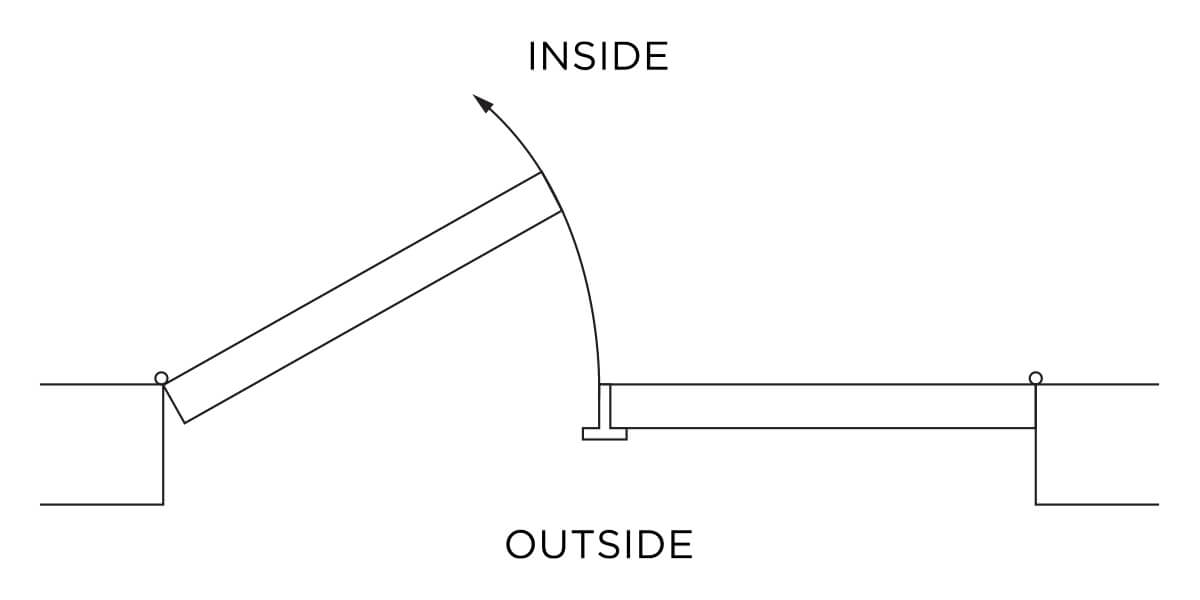
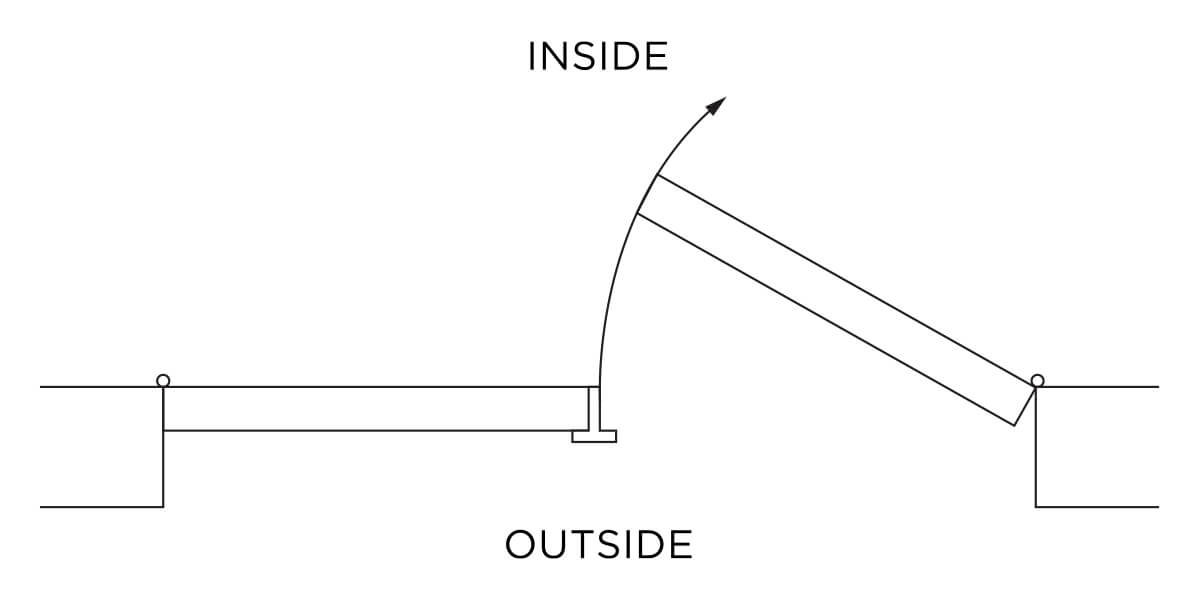
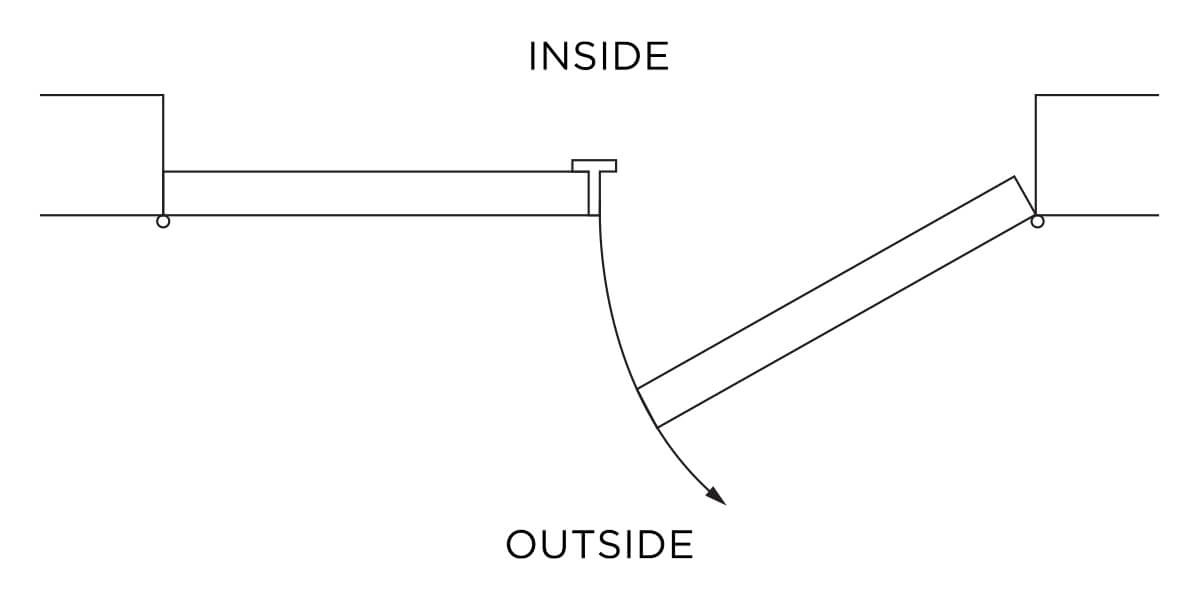
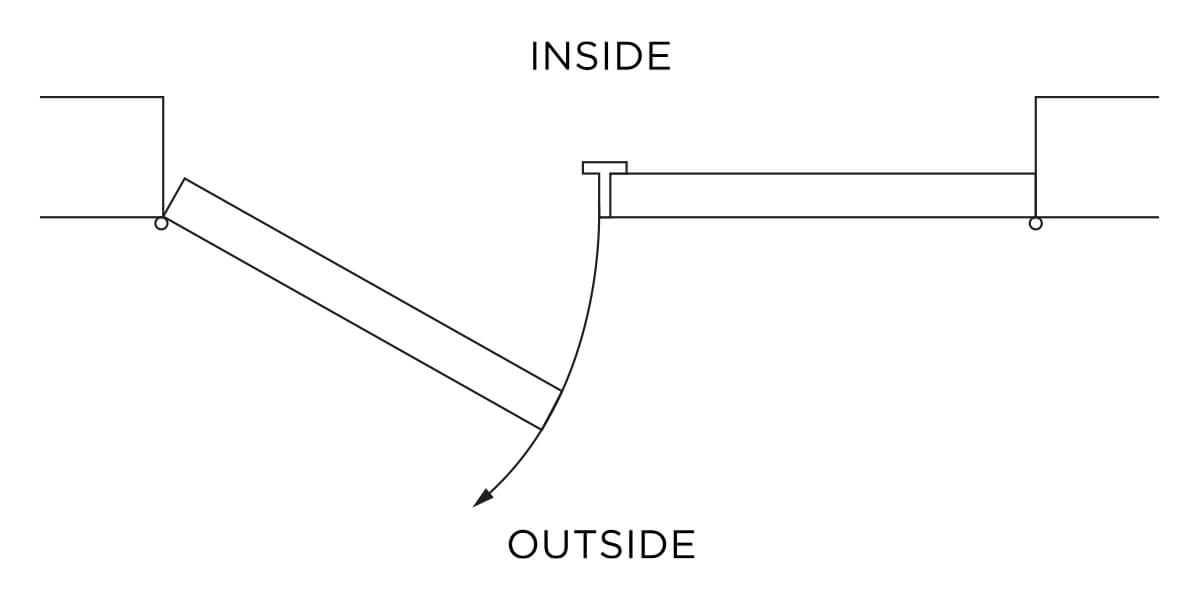
Next, determine if you want the door to swing inside or outside the room. Inside is an “inswing” door, and outside is an “outswing” door. Review the illustrations below to identify the way you would like your door to be handed and swing (Note: These illustrations apply to single doors).
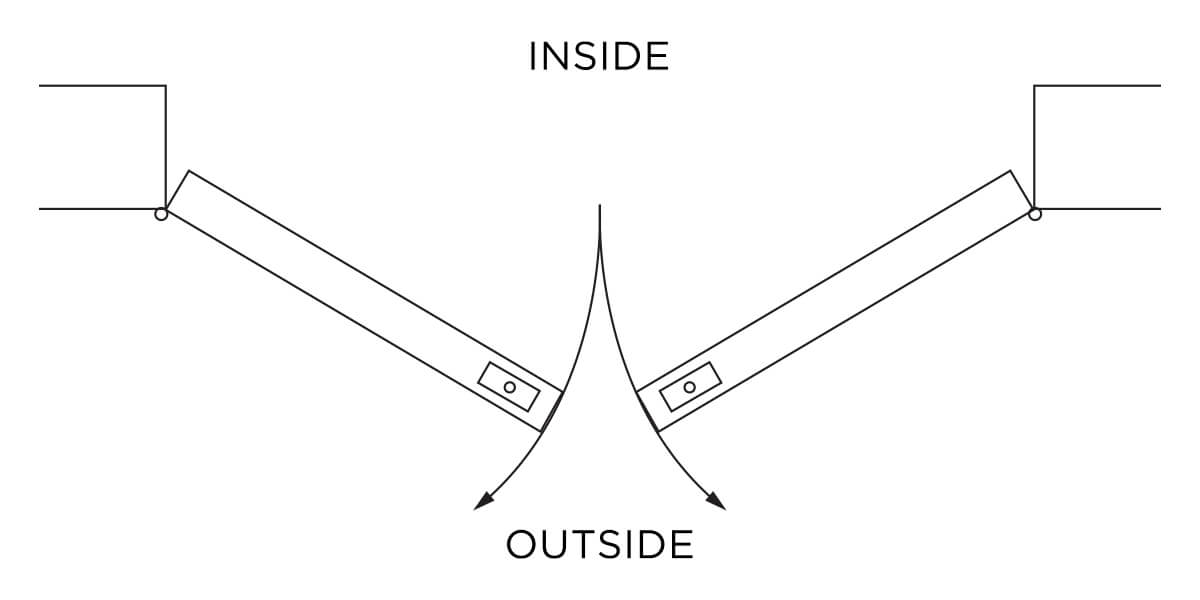
For double doors, one door is designated as “active” (operating knob or handle to open the door), and the other door is designated as “inactive” (still opens and closes, but no working knob or handle). The inactive door includes an attached “T-astragal” with flush bolt (top flush bolt only) to secure the door in the closed position. Review the illustrations below to select which side of your double door you would like active, and its handing and swing (inside or outside of the room).
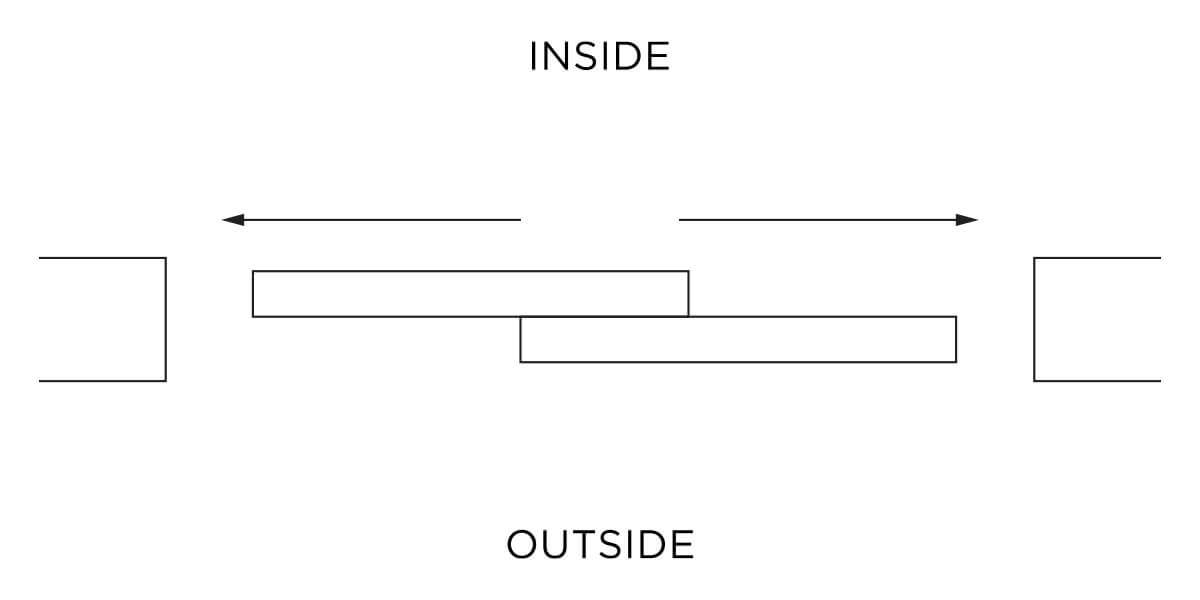
In addition to these handing and swing options, we also offer double doors with a “Ball Catch” or a “Bypass” configuration. These double door options are most frequently used on closet door applications. For example, Ball Catches are typically used with “dummy” (non-active) handle sets, on outswing closet doors. Ball Catch hardware is included at no additional charge on double Ball Catch doors, and track hardware is provided at no additional charge on double Bypass doors. We do not bore for the dummy handle sets on these options. Review the illustrations below to select one of these double door applications.
How Do I Choose the Right Bore Position (for Hardware)?
The bore position for your new door depends upon the type and function of the hardware (knob or handle) you desire to use on the door. Consult your hardware supplier for their recommendations. When you order a pre-hung door, we can bore your new door for a handle or lockset, at no extra charge. This prepares the door for hardware installation. Our standard bore options and dimensions are documented in this section.
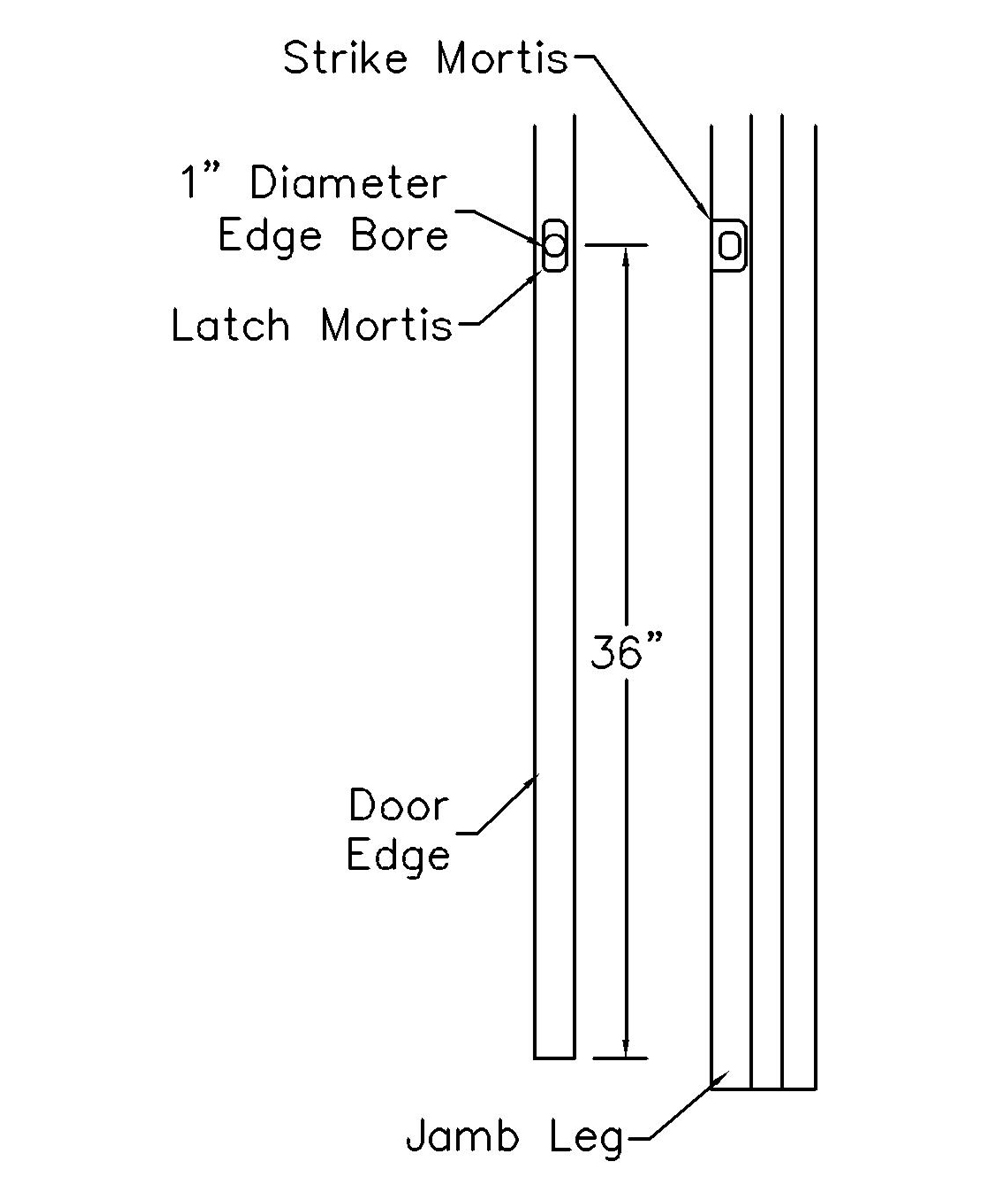
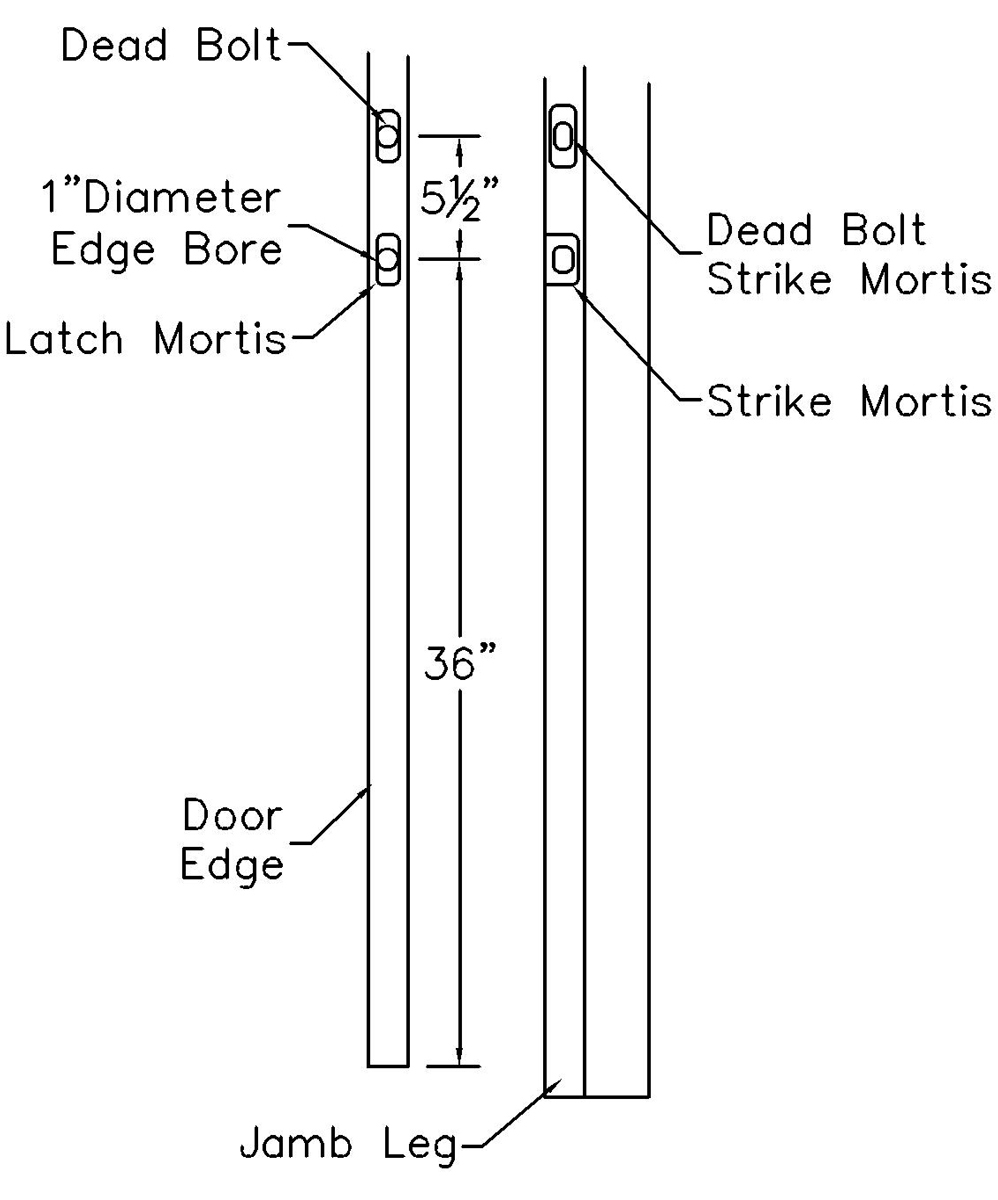
We offer both single bore and double bore options. Our bores include mortising the edge of the door for the latch (latch and dead bolt for double bore) and mortising the “strike” on the jamb leg where the latch inserts (or latch and deadbolt for double bore).
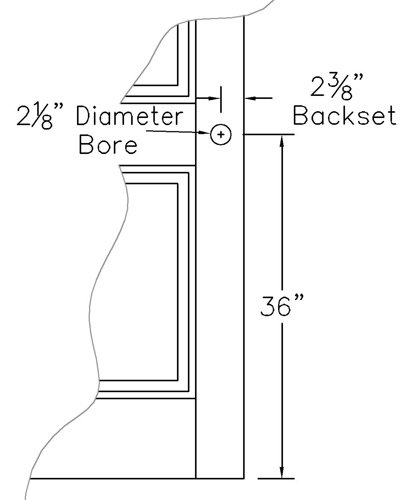
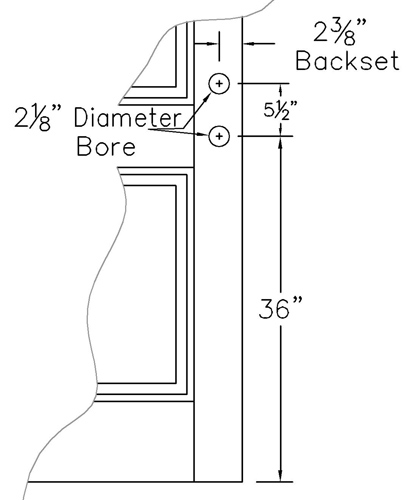
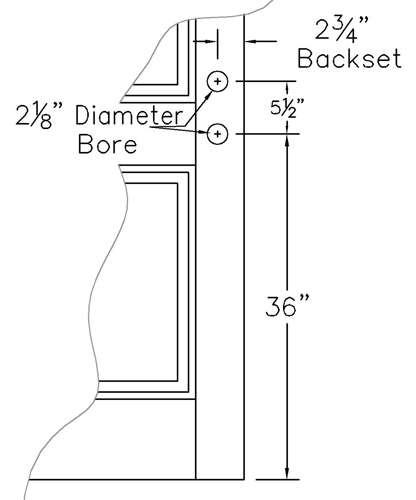
The knob or handle bore is 36” from the bottom of the door to the center of the bore hole, and the bore hole is 2-1/8” in diameter. For double bore options, the distance between the two bore holes is always 5-1/2” center to center (from the center of the diameter of the knob or handle bore to the center of the diameter of the dead bolt bore).
Available Backsets
Available “backsets” (the distance from the edge of the door to the center of the bore diameter) are:
2-3/8”
2-3/4”
Review the following illustrations to select the bore and backset you desire for your new door.

How Do I Install My Interior Door?
Step-by-step instructions for installing a pre-hung interior door are provided in this section. We assume no liability associated with following these instructions, and strongly suggest that you consult a professional contractor for door installation. The skill level for this installation is “Intermediate.”
Tools Required
- 6′ Level
- Hammer
- Drill
- Tape Measure
Materials Required
- Interior door, pre-hung and pre-finished
- Shims
- 2-1/2″ Finishing Nails
- 2-1/2″ Screws
Step-by-Step Instructions
- Place the door and jamb unit in the opening. Position the pre-hung door unit in the rough opening. Center the unit so that equal spacing exists between the unit and the wall studs or wall structure on each side.
- Shim the hinge side of the door. Shims should be used to fill the open space between the door jamb and wall on the hinge side of the unit. Place shims between the door unit and wall at each hinge location.
- Temporarily secure the door in the opening. Ensure that the door unit is flush with the face of the sheet rock, front and back. Pre-drill a hole through the door stop at the top hinge shim. Nail one 2-1/2″ finishing nail in this hole to temporarily hold the door in place.
- Verify that the hinge side of the door is square and plumb. Using a 6′ level placed on the front face of the hinge side of the jamb, verify that the jamb is square. Adjust the middle and lower hinge shims until the bubble on the level is exactly in the center. After the hinge side of the jamb is square, check for plumb on the jamb. Rotate the level so it is sitting flat along the front edge of the hinge side of the jamb. Again ensure that the associated bubble on the level is exactly in the center.
- Secure the jamb on the hinge side. Once the hinge side of the jamb is square and plumb, pre-drill holes through the stop at both the center and bottom hinges. Nail 2-1/2″ finishing nails through these holes to secure the hinge side of the jamb in place.
- Shim the strike side of the door. Shim the strike side (latch side) of the door unit, placing shims at the top, center, and bottom of the unit between the jamb and wall.
- Verify the strike side of the door is square and plumb. Using a 6′ level placed on the face of the strike side of the jamb, verify that the jamb is square. Adjust the middle and lower strike side shims until the bubble on the level is exactly in the center. After the strike side of the jamb is square, check for plumb on the jamb. Rotate the level so it is sitting flat along the front facing edge of the strike side of the jamb. Again ensure that the associated bubble on the level is exactly in the center.
- Secure the jamb on the strike side. Once the strike side of the jamb is square and plumb, pre-drill holes through the jamb at both the center and bottom of the strike side of the jamb. Nail 2-1/2″ finishing nails through these holes to secure the strike side of the jamb in place.
- Verify width measurements. Using the tape measure, verify that the distance between the hinge jamb and strike jamb is the same at the top, center, and bottom of the jamb. Carefully remove temporary nails and add or remove shims to adjust for equal distance at each position. Replace temporary nails after adjustment.
- Shim the header (top) of the jamb. Place shims in two equal positions on the top of the door unit, between the header (top) of the jamb and the wall above. Adjust the shims until an even margin (called the “reveal”) exists between the door and the jamb across the top of the door.
- Secure the jamb header (top). Pre-drill holes through the door stop in the location of each of the two shims on the head (top) of the unit. Nail 2-1/2” finishing nails through these holes to secure the head of the jamb into place.
- Verify the “reveal.” Close the door and check to ensure that equal spacing exists between the door and jamb at the top and along both sides (again, called the “reveal”). Adjust shims at any position until equal spacing is achieved.
- Secure the unit with additional finishing nails. After verification of an even reveal, a second set of nails is needed to secure the jamb. Open the door and, on the hinge side of the jamb, place a second 2-1/2” finishing nail next to the stop but on the narrow side of the jamb, for each of the three shim positions. Repeat this on the strike side of the door jamb. When all finishing nails have been installed, use a nail to counter sink the heads of all finishing nails.
- Replace center screws on the hinges. Once the second set of finishing nails are in place, remove the center hinge screw(s) from the top hinge where the hinge secures to the jamb (not where the hinge is attached to the door). Replace the screw(s) with a 2-1/2” screw(s). Repeat this step on the center and bottom hinges (again, jamb side of the hinge only).
The interior door is now installed, and case moulding (if applicable) can be installed.
Exterior doors are not sold on the MDF-Doors.com website. For exterior door installation, we strongly suggest that you consult a professional contractor.